Thursday, May 30, 2013

Vintage Postcard Wedding

Last night, I was up at Kapalua Bay photographing an intimate wedding on the beach.  The bride was wearing a gorgeous, ruffled creation and the groom a soft, wheat-colored suit with a polka-dot lining.  The sunset light was gentle, diffused with a hint of glow, and as I surveyed the scene, all I could think of was those vintage-y Hawaiian postcards of golden sunsets with pastel-toned backgrounds and swaying palm trees.  I've recently become a fan of Kerne Erickson, an artist who renders beautiful and nostalgic images like this one, reminiscent of old advertising posters.  

Artwork © Kerne Erickson

As I was editing the photos from the wedding today, I decided to experiment a little with some of the filters in Lightroom, although the final images are really a complex composite of work in not only Lightroom, but also Photoshop and Portrait Professional.  For those of you interested in the process beyond basic editing, I began by applying the Cold Process 3 Lightroom Color Preset to the photos, then went from there.  I tweaked the levels, tonal range and saturation until I got what I wanted.  The first one is my favorite photo, which was actually one I intentionally over-exposed (I already knew I was going to try to "vintagize" them today), while the others are straight-forward in terms of exposure.  Goes to show how important the final output is to your shooting workflow!  Drop me a line and tell me what you think about the effect.  I'd love to hear thoughts on filters in general: can they be fun, or are they too gimmicky? There's never a wrong way, just a different way of thinking.  

© Katherine Agurcia 2013 - All Rights Reserved, Reproduction Prohibited

© Katherine Agurcia 2013 - All Rights Reserved, Reproduction Prohibited

© Katherine Agurcia 2013 - All Rights Reserved, Reproduction Prohibited


© Katherine Agurcia 2013 - All Rights Reserved, Reproduction Prohibited

© Katherine Agurcia 2013 - All Rights Reserved, Reproduction Prohibited

K.A.


Sunday, May 19, 2013

Photographing the Martin Family

You may not believe it, but sometimes the weather isn't perfect in Maui.  Especially last week, when it rained every single day.  It can be frustrating for a photographer, because clients reschedule and cancel left and right, and I can hardly blame them.  The Martin family is one of those clients I wish others could emulate.  They planned their session far in advance, and left a nice margin between their session and the day they were leaving, "just in case."  They were relaxed and took the weather in stride, which was a good thing because we had to wait until four o'clock on the day of their session to make sure that the weather would hold.  It was still grayish and overcast when we set out, not necessarily a bad thing.  As you can see by the photos below, the golden overcast skies made their skin tones glow, and no one was fighting a sun squint or had awkward shadows cutting across their faces.  The family also trusted me to pick their location (Kapalua Bay), and to select a shot sequence list (aside from a few certain key photo arrangements they wanted).  It is so fabulous to be able to photograph this way, because it frees me up to be really creative and to capture the family in a way that is aesthetically pleasing.  For potential portrait clients reading this, I always recommend finding a photographer whose work and aesthetic you enjoy, and then letting them "do their thing."  Try not to force a photographer to create a photo the way you want it to be, because chances are, it will not happen, and you will end up disappointed.  As a photographer, I am quite confident of my skills, and as long as I know that my clients are aware of how I shoot and what my style looks like, I can guarantee that we will end up with a successful portfolio.

This session was particularly special because Mom and Dad were celebrating their 30th wedding anniversary, and the family was traveling together for the first time in a long time.  It had also been way too many years since they'd had a family portrait taken together.  This first photo is a traditional "ice breaker" pose I almost always start with.  It loosens people up, and it is similar to other poses I will be using later on in the session, so they can remember it and fall in quickly when required.

© Katherine Agurcia 2013 - All Rights Reserved, Reproduction Prohibited

© Katherine Agurcia 2013 - All Rights Reserved, Reproduction Prohibited

© Katherine Agurcia 2013 - All Rights Reserved, Reproduction Prohibited

A challenging situation that photographers face when photographing the different people of a family is how to politely ask individual people to either be in the photo, or to excuse themselves for a photo for a certain shot.  In this instance, the daughter's boyfriend was traveling with the family, so it was understood he would be in some photos, but not all.  What I recommend is the following:

  • Photographer: discuss and lay out the shot list with the organizing individual (usually Mom) before the session, so you are all on the same page.  As a bonus, you will know exactly what the client wants, and can avoid the disappointment of not getting a photo that the family wishes had been taken.  Before the session begins, gather the people around and explain to them what you will be taking, give a general layout of your shot list, and tell them what is expected of them.  Do not ignore special requests; sometimes these become the most cherished photos of the session.  
  • Clients: discuss the shot list with the other members of the family.  Add that they are welcome to request special photos that are not included in the list.  (As a photographer, I am paid for my time.  Some photographers are different, they may charge for the number of people.  Basically, when you set up a session with me, I photograph for 45 minutes to one hour, and get in as much as I can, so I actually request of families to get really creative and get in all those shots they want and take advantage of their time.  A good client will allow that I am familiar with the location and with the time and will let me define the flow of the session around special requests.  Discuss this with your photographer before the session). 


© Katherine Agurcia 2013 - All Rights Reserved, Reproduction Prohibited

© Katherine Agurcia 2013 - All Rights Reserved, Reproduction Prohibited

© Katherine Agurcia 2013 - All Rights Reserved, Reproduction Prohibited

© Katherine Agurcia 2013 - All Rights Reserved, Reproduction Prohibited

© Katherine Agurcia 2013 - All Rights Reserved, Reproduction Prohibited

© Katherine Agurcia 2013 - All Rights Reserved, Reproduction Prohibited

As I was pretty sure would happen, the sun dropped below the cloud line and created this amazing, dazzling show of light before it slid down over the horizon.  I could not have asked for better lighting, and I was able to get the clients these stellar family and anniversary photos.  They were an absolute pleasure to work with, and I look forward to seeing them again next year!

K.A.

Tuesday, May 14, 2013

Photographing Little Leilani

This morning, I got to photograph a sweet little Island Princess named Leilani.  She was wearing the most adorable frilly pink dress, just absolutely dreamy.  Parents will often ask how they should dress their children, and my first answer is "age-appropriate!"  Let them be little kids.  Let them be playful.  Let the little boys come in with scabs and marker scribbles on their hands, the little girls with chipped glitter nail polish and their favorite red boots.  They're not this cute forever.  Letting them be themselves brings out the best in them.  Not enough parents do photo sessions just for their kids, missing out on a tremendous opportunity to create permanent memories of such a short time in their lives.  Consider booking an appointment just for your kids; do the family later.  The photographer will appreciate having this time just to focus on your child.  Being loose and having no time constraints brings out all those happy (photogenic) smiles.   See? Isn't she the cutest? 
© Katherine Agurcia 2013 - All Rights Reserved, Reproduction Prohibited

K.A.

Monday, May 13, 2013

Photographing Individuals

I am often asked if photographing "the famous" makes me nervous, and the answer is yes, although not for the reasons you would think.  Photographing "professionals" is actually a piece of cake: the know what they are doing, they respond well to direction and posing instructions, they are not afraid of the camera, and they have been thoroughly "prepped" to look their best (i.e. makeup, hair, wardrobe, etc.).   I only get nervous about the unexpected or unknown, such as impromptu shoots, or additional people, weather conditions, or other such matters.   Photographing "everyday Joes" is definitely much more challenging, in this sense, than celebrities.  

Very few people like having their portraits made, that's a fact.  For some reason or another, our society correlates being comfortable in your own skin as a form of vanity, which is a negative thing.  I truly feel sad for generations of women who are insecure about their physical selves because they were always convinced that being happy and decisive about their looks (and "over it") was akin to being vain.  While I strongly wish that all women over the age of thirty should have a solid sense of who they are, are okay with the way they look, know what looks good on them and are instinctive about their wardrobe decisions, this is simply not the reality.  More and more often than not, I see women reach high levels of anxiety and discomfort before, during, and after their photo session.  Another photographer joked with me one time that being a portrait photographer requires you to be a trained psychologist 50% of the time: reassuring people, listening to their woes, telling them "no, you're not fat or ugly," or simply managing to work around a myriad of insecurities.  Photographs and portraits are a fact of life, they will happen, and for those prospective clients out there reading this (and photographers who wish to make it easier on their clients), here are a few strong but simple tips to help guide you to success (and, ladies, read this article about why portraits are so important):

  • Photographers: never book for the same day.  Allow one or a few days between booking and actual session so that the client has time to "set their mind" to the task.  Clients: make time for your photograph.  Find a photographer while you're on vacation, for example, so you can look fresh and happy.  Try not to book on weekends; you'll be forced to "make time" during the week, and this will push you to be more responsible about how you look.
  • Strongly recommend to the ladies that they take their time to get their hair and makeup done, and get a professional manicure and pedicure.  Have people you can recommend, with variable price ranges.  For clients, if you cannot afford this, do it yourself.  A little bit of care goes a long way.  
  • Recommend that people wear what they feel comfortable in, not what is "trendy." Ask women, in particular, to choose between two or three different outfits.  Ask them to wear colors that are good for their skin tone.  For clients, you can ask someone you trust to tell you what you look good in.  Ask them to be honest, and don't take it personal.  
  • I've always been told to tell clients to wear minimal jewelry, but instead I have found that interesting jewelry helps to elevate the clients' confidence level, especially when they are "showing it off."  Pose ladies, in particular, with an emphasis on wedding rings or other poignant jewelry.  Clients, don't wear something that makes you feel vulnerable or "weird!"  
This wonderful lady in these sample photos teaches volumes about being prepared for a portrait session.  She may not be a celebrity, but she took the time to get her hair done (she did it herself), has on simple but appropriate make-up, got a brand-new manicure and pedicure (used a LivingSocial coupon!), and chose simple clothes in color tonalities that worked perfectly with her skin tone, body and shape.  It made my job incredibly easy, because when I  posed her, I did not have to worry about hiding bad nails, lopsided makeup, or wrinkled or hitched-up clothing.  As I find it very important to include the hands in my portraits, the photos were instantly successful due to her bright nails and interesting jewelry.  I was able to work with her in different environments and in different poses, without having to adjust for "inconveniences."  


© Katherine Agurcia 2013 - All Rights Reserved, Reproduction Prohibited
     
© Katherine Agurcia 2013 - All Rights Reserved, Reproduction Prohibited

© Katherine Agurcia 2013 - All Rights Reserved, Reproduction Prohibited

She was definitely happy about her photos, and I did remind her that most of that was due to her, and thanked her for taking the time to prepare.  

Technical Details:

Canon EOS Rebel t4i (camera)
Canon EX 600EX-RT Speedlight (flash)
Canon 17-55mm (lens)

I always photograph using manual settings.  Usually, I photography at ISO 200, except at sunset, when I like to "soften" the images, and I use an ISO 400.  I set my background first, usually around 1/200 or 1/125 for speed.  Since I use a camera-mounted flash, I set that usually at 0 TTL (depending on the light--if the light behind the subject is strong, I bump it up all the way to 3 TTL), and then I work on my f-stop (usually between 5.6 and 14).  

Photos were edited using Adobe Lightroom 4, Photoshop 6, and Portrait Professional.

As always, come back for more tips on photographing people and taking portraits, and check out some previous posts by clicking on the different topic labels to the right.  

K.A.

Thursday, May 9, 2013

Photographing Families

Well, hello there!  This post is part of the foundation for a new collection of work that I'll be showing soon.  I'm working on an introduction piece on photographing people, so come back soon to check that one out.  I promise that it will be very interesting!  Photographing people is always a challenge, but hopefully with a few tips here and there, you'll become great at it in no time.  I'll be showcasing different sessions as often as I can, and I'd like to start with this one I did last night around the Ka'anapali area in West Maui.  This lovely family, from Orange County, California, vacations on the island almost every year, and I had the privilege of photographing them during a gorgeous and luminous Maui sunset.  I picked my favorite ones from each set.

© Katherine Agurcia 2013 - All Rights Reserved, Reproduction Prohibited

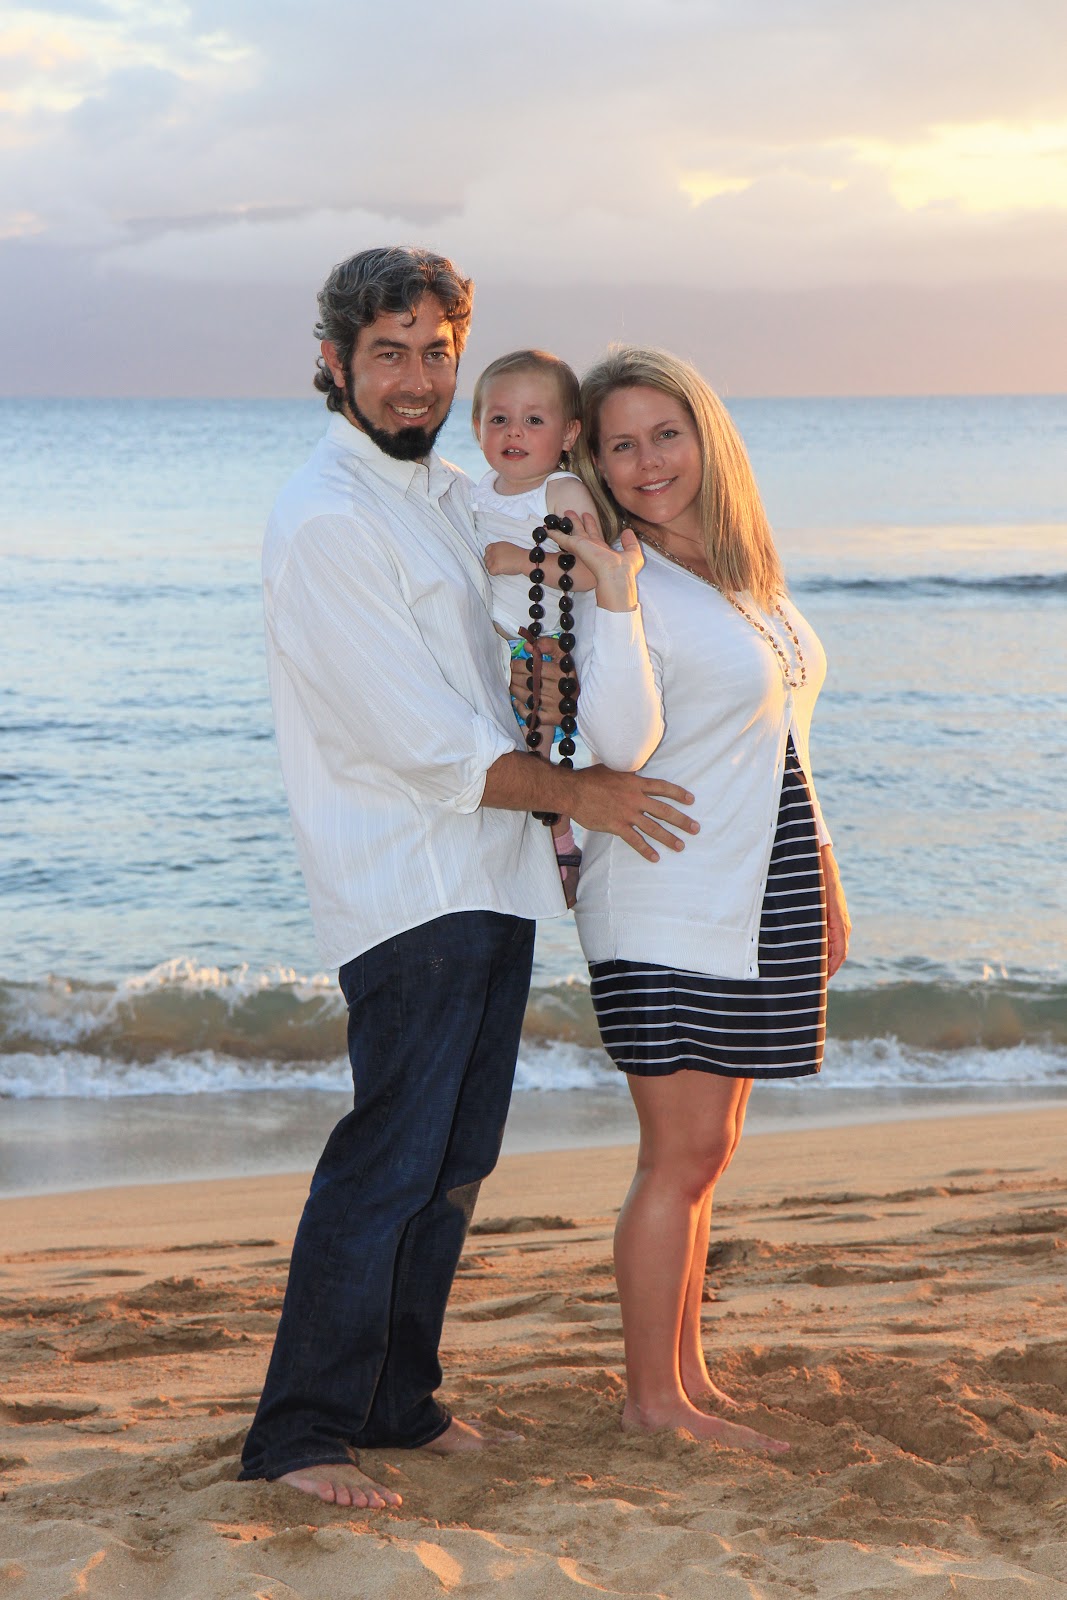
We've all heard about the "Golden Hour" of photography, or that moment in time right around sunset, when the skies turn a beautiful and soft yellow, with pink and lilac undertones.  It's important to remember that although the sunset is nice and all, using the light appropriately is more important.  Using the sunset as a support light, rather than your main light, intensifies its effects, and shows off those colors behind your subjects.  On western Maui, it is easy to offset your clients, since the sun usually sets slight off-center from the coastline.  I use a soft ISO--400--and set my camera to manual.  First, I find my correct background exposure speed (usually about 1/200 or 1/125) and then set my on-camera flash on 0 at TTL.  I adjust my f-stop accordingly (usually 8 or 5.6, rarely lower, or else I risk lots of troublesome soft focus).  For this shot, giving the girl something to hold on to made her hands seems less fidgety.  Men and small children often don't know what to do with their hands, so I make sure to give them a pose immediately.  I try to keep the hands in the photo whenever possible, I feel that they are aesthetically important, as well as grounding.  

© Katherine Agurcia 2013 - All Rights Reserved, Reproduction Prohibited

Babies are always a trip.  Sometimes, you have to think outside the box to get them to do what you want.  Try non-traditional poses.  It felt awkward for the family to stand this way, but in the end, it worked, the light worked, and the baby was happy.  Nothing matters in the end unless the photo works.  


© Katherine Agurcia 2013 - All Rights Reserved, Reproduction Prohibited

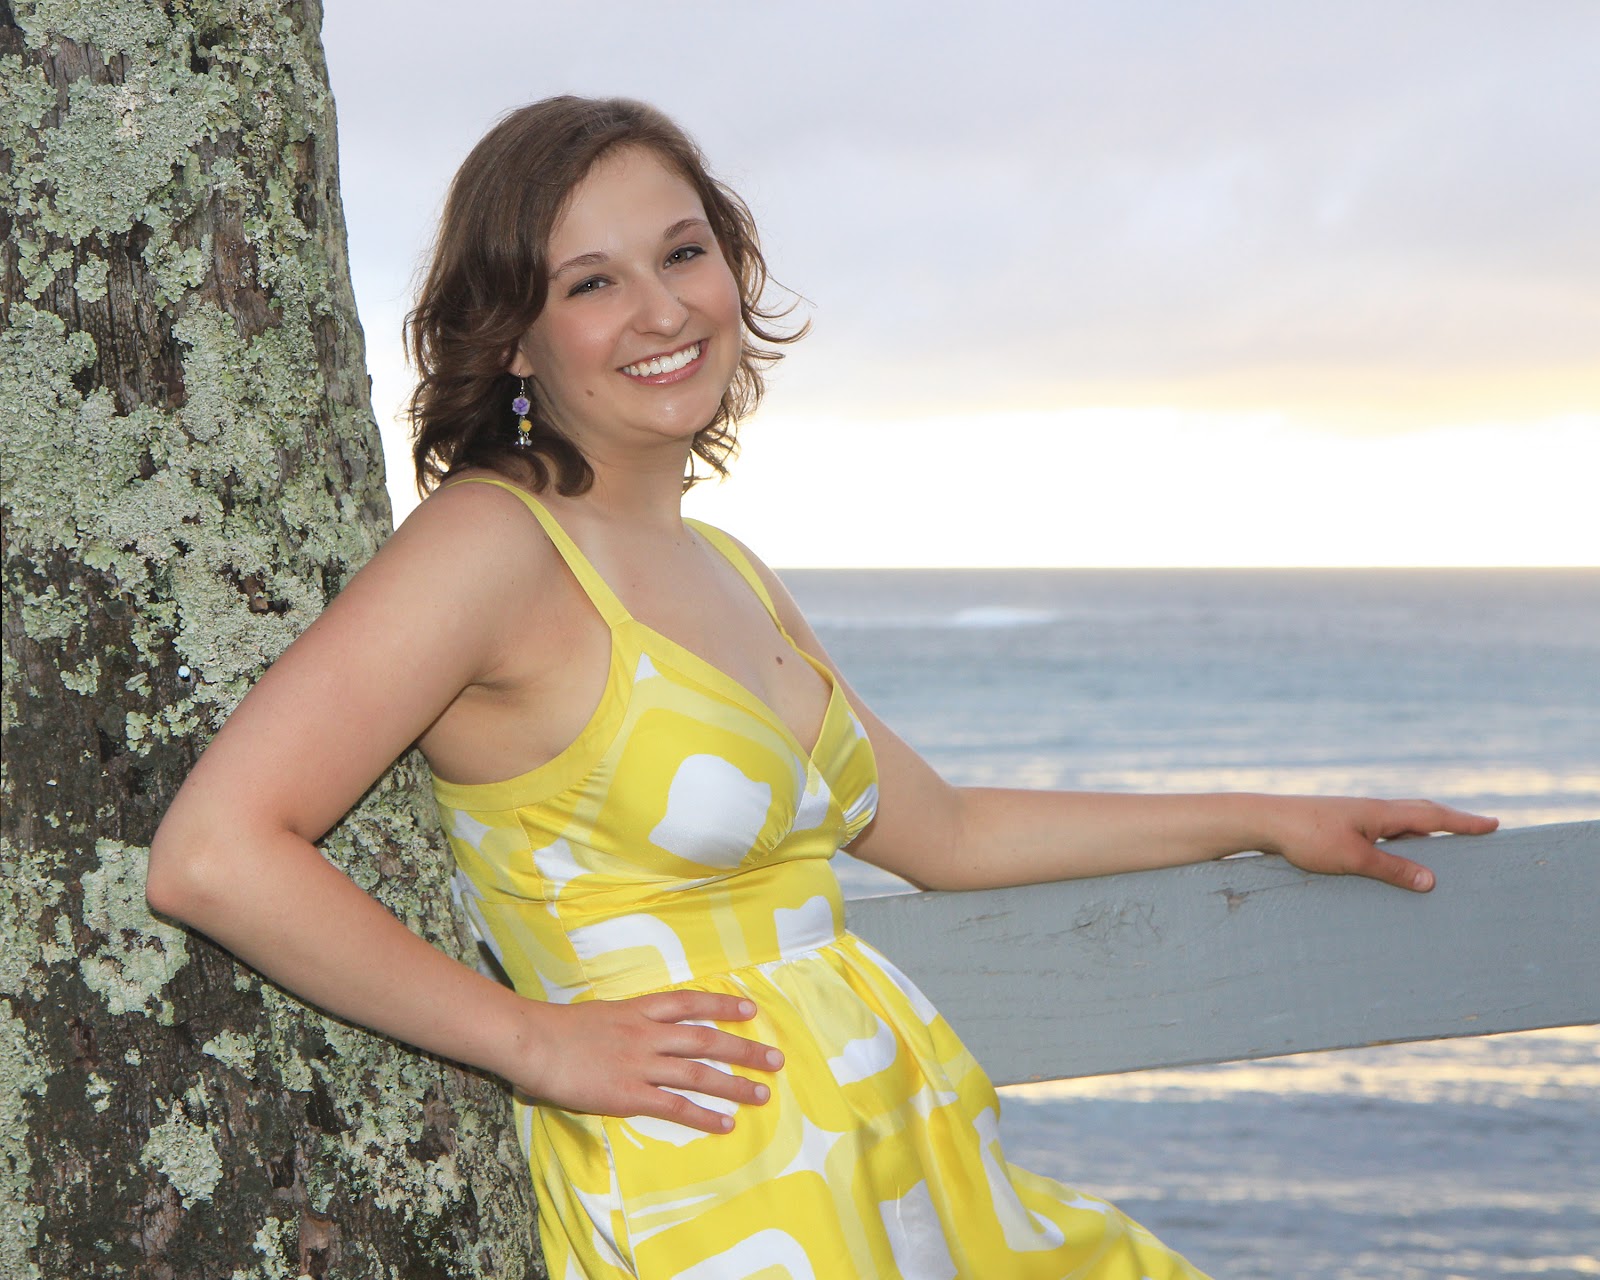
Is there anything prettier than this?  Little girls usually love to feel pretty (who doesn't?), so complimenting them, and telling them so, helps bunches when producing these types of photos.  Classical poses for women can be found all over the last thousand years of portraiture, from painting to photography.  Study different artists that you enjoy.  I particularly find much of my inspiration in dramatic posing from the 1920s and in post-Illumination French paintings and Art Deco.  Don't be afraid of femininity or masculinity; make sure to flaunt those traits, such as beautiful, flowing hair, or well-toned arms and solid chins.  

© Katherine Agurcia 2013 - All Rights Reserved, Reproduction Prohibited

The big family usually strikes a chord of terror in photographers' hearts.  I recommend getting this shot out of the way first.  Get solid on your posing, and you can never act a fool enough while holding the camera (to get their attention).  Adults and children both will be entertained, and not fail to smile.   Wear a funny hat, sing, dance, do whatever you need to hold people's attention.  Nail your exposure the first time, while they are getting ready, so that you can shoot off a string of photos to get the perfect one.

© Katherine Agurcia 2013 - All Rights Reserved, Reproduction Prohibited

These two photos here are an example of good, solid, old-fashioned posing.  I know many photographers who shun traditional posing, or insist on being "modern," whatever that means.  What I can tell you is that there is a reason why it works: it looks good, it makes people feel good, it's familiar, and if it's not broke, don't fix it.  Remember, rules are made to be broken, but only if you know those rules inside out.  Get your classical poses down before you attempt "modern" (again, whatever that is).

© Katherine Agurcia 2013 - All Rights Reserved, Reproduction Prohibited

These last three are all samples of traditional posing in family photography.  A few notes:

  • Watch those horizon lines.  Keep them below the heads; this may mean getting down lower on the ground.  Practice with this idea; you will see how the photo "weighs" differently with the horizon line above or below the head lines. 
  • Be aware of the "Rule of Thirds."  Use your space in a circular manner, and keep those horizon lines / trees / posts away from the center lines.  
  • Use an "open book" design: think of the two halves of a book, opened, either laid flat or partway.  Angle people in such a way that it appears like an "open book." This is also a good visual to give people so they understand how you want them to stand.
  • Pose in order of importance: grandparents, babies, couples, children, etc. in the center, and then radiating out.  Resist the urge to throw babies off to the side, or split couples up (yes, you can break the rules, sometimes, but knowing when is dire).  If one individual's presence is stronger than the others', put them front and center, and use their energy to focus the photograph.  Usually, it's these folks who make or break the photo, so pose them accordingly.  
  • Make sure everyone knows what to do with their hands!!!

© Katherine Agurcia 2013 - All Rights Reserved, Reproduction Prohibited

© Katherine Agurcia 2013 - All Rights Reserved, Reproduction Prohibited

© Katherine Agurcia 2013 - All Rights Reserved, Reproduction Prohibited

Feel free to ask any questions, I'll be glad to answer! Stay tuned for more portrait series and tips.  

Technical information:

Canon EOS Rebel t4i (camera)
Canon EX 600EX-RT Speedlight (flash)
Canon 17-55mm (lens)

I always photograph using manual settings.  Usually, I photography at ISO 200, except at sunset, when I like to "soften" the images, and I use an ISO 400.  I set my background first, usually around 1/200 or 1/125 for speed.  Since I use a camera-mounted flash, I set that usually at 0 TTL (depending on the light--if the light behind the subject is strong, I bump it up all the way to 3 TTL), and then I work on my f-stop (usually between 5.6 and 14).  

Photos were edited using Adobe Lightroom 4, Photoshop 6, and Portrait Professional.


K.A. 


Sunday, February 17, 2013

"Necessary" Equipment


A question I get asked often:

"What equipment is 'necessary' to be a well-rounded photographer?"

You're not going to like the truth.  People sometimes think that if they have the "right" tools, then their work is suddenly going to be fantastic.  The reality is that the work is only as successful as it can be in relation to the amount of effort that is put into it.  Just like one can't run a marathon on a whim, and instead must practice and become disciplined, so it is with photography.  A camera is not a magical tool that turns anyone into an artist; instead, it is a medium that an artist uses to create their vision.  

A had a professor in college whose favorite question to new students was, "who controls the outcome of the image, the photography, the camera, or the subject?"  This is a question I have posed before on this blog, and one whose answer I will reinforce again: it is, always has been, and always will be the photographer.  Any romantic ideas to the contrary will only work against the photographer.  There is a reason why professional photographers are often stereotyped as being bossy, pushy and rather cold.  It is a profession that demands distance and emotional detachment.  As unattractive as it sounds, it is necessary that we do not get involved in the nuanced drama of our surroundings.  And yes, I do hear your grumbling murmurs of disagreement: "well, didn't it work for that one guy?"  There are always going to be exceptions, and yes, a little affection for your subject can go a long way, but for the most part, these same photographers are still firm in their belief that they are the sole creators of their photo.

Before I go on, I want to make sure that we all understand (me and  you, the reader), that my comments are directed at those who consider themselves "serious" photographers, as in, people who have not only invested "serious" amounts of money into their equipment, but also "serious" amounts of time, not only in the act of photographing, but also in research, printing, manipulation of the images, and in the creation of cohesive collections of work.  Everyone has differing ideas as to what is "necessary" in an equipment arsenal, and I expect some argument from other photographers, but here is my personal list to cover all bases:

  • A computer.  I consider this more important than a camera.  Blasphemy, you say.  Well, here is my logic.  Cameras these days are cheap, and they are everywhere, even on your phone.  Anyone can take a photo.  What they can't always do is manipulate it, store it, and share it.  A computer will allow you to do all these, and set you on a course for building your own studio.
  • Photoshop.  I don't like the word 'purist.'  To me, being a purist, as it is modernly defined, is exclusionary.  As an artist, I am always intrigued by the potential for undiscovered tools.  For a photographer, Photoshop should be a requirement, if only to fix pesky uneven horizons, or to equalize colors, or merely to prepare an image for print.  Photoshop is expensive, user-unfriendly, and a hassle, but it is a necessity.  
  • Okay, now you need a camera.  Sure, a nice digital SLR is great, but I have also taught students with no financial possibility of acquiring one, and this did not stop them: they used old, defunct mobile phones, the photocopier at the library, a public scanner, and even old photographic paper.  If you can't wrap your head around this, then you need to educate yourself and re-examine the history and definition of "photography."  Thus, you will see why a computer and a means to manipulate and share your images is more important.  Now, in case that you can afford a single-lens reflex camera, you don't have to immediately go in whole hog: just something that can shoot in manual mode will do, and preferably one that has interchangeable lenses.
  • Lenses:  creative opportunities in photography abound with lenses (or the lack thereof: such as in pinhole photography).  Plastic lenses can be as much fun as glass lenses.  Keep in mind that the better the glass, the sharper and "better" the photos, and therefore, more expensive.  In an ideal world, these are the lens sizes I would own:
    • Wide-angle: at least a 10mm, for shooting interiors and architecture.
    • A variable lens, from at least 28mm to 70mm, preferably 135mm, for those "general" shots.  This is a good carry-around lens that gets most jobs done.
    • A fixed 50mm lens, for food shots.  Best lens ever for food shots.
    • A fixed 85mm lens for portraits.  This is the magic size for getting the most realistic-looking portraits.
    • A zoom lens, 100mm-300mm.  This is also a secret weapon for portraits.  And, of course, for getting those far-off shots.  
  • A light source.  I'm okay with speed lights, and they have their use, but I will exchange them for a single strobe any day.  Any strobe will do.  There are pretty cheap ones out there.  The reason behind this is that offset light beats direct light any day.  A set of strobes is invaluable.  You get extra-credit for getting strobes that can hold a charge and can be transported outside without the need for power cables.  
  • Stands of all kinds, and tripods.  Rig your own, it doesn't matter.  You need stands to rig your cameras, lights, and other photo stuff.  Clamps, too.  You can find some great DIY sites on the Internet; Home Depot is your new best friend.
  • A scanner.  A good photo scanner can pull multiple duties, including as a camera!  Add it to your now-growing studio for extra effectiveness.
What about a printer? Well, to be honest, I am always fighting with printers, and although I would love to have a fancy one in my home, printing has come so far and so cheaply that I leave it up to the experts, and I work with a few online that only accept work from professional photographers.  Remember, printing is as much of a skill on its own as photography is, so it might not benefit you at all to do this yourself.  Your time is the most expensive thing of all!

Although I have not endorsed specific products on these pages, I'd be happy to share my current preferences through private message or e-mail.  Send me your thoughts and I'll reply as soon as I can.  There are so many new products coming out every day that my preferences might change month to month.  

Use this list as a blueprint to build your own arsenal of "necessities," and don't be shy about sharing your own list!  

Saturday, October 13, 2012

New Artist

New artist is up on the digital gallery.  The artist is Beth Maciorowski, from Northampton, Massachusetts.  Take a look at her work here, or  click on the "gallery" button above.  Drop her a line if you are interested in her work.